My Sewing Projects and progress

Hi! As someone who's been sewing for years, I am really impressed with your projects and willingness to experiment! I meet so many people who say they want to learn how to sew but are scared to try because they might make mistakes - like, yeah, obviously there will be mistakes, how else will you learn?
That being said, I would like to weigh in on your front-onesie-issue. I know you already said you will make the front piece more narrow, and I agree: The shape you're going for reminds me of a cloth diaper onesie patter I saw a while ago (but tiny sized). The top front edge was pretty much straight, which yours also is, but the crotch front edge was barely flared out from the middle. I think it would still give you the support you want, but maybe would help it look less like shorts? If sewing onesies has taught me anything, it's that you always need way less width in the front than you think you do for good coverage.

Also: Do you find the serger to be easier to use? I keep going back and forth on wanting one, and so far I've gotten on just fine with just a decent sewing machine, but sometimes I think it could be convenient.
 
Schwanensee said:
Hi! As someone who's been sewing for years, I am really impressed with your projects and willingness to experiment! I meet so many people who say they want to learn how to sew but are scared to try because they might make mistakes - like, yeah, obviously there will be mistakes, how else will you learn?
Thanks, You definitely need to be ready to make mistakes or you'll never know how far you can take things or find those creative solutions.

Schwanensee said:
That being said, I would like to weigh in on your front-onesie-issue. I know you already said you will make the front piece more narrow, and I agree: The shape you're going for reminds me of a cloth diaper onesie patter I saw a while ago (but tiny sized). The top front edge was pretty much straight, which yours also is, but the crotch front edge was barely flared out from the middle. I think it would still give you the support you want, but maybe would help it look less like shorts? If sewing onesies has taught me anything, it's that you always need way less width in the front than you think you do for good coverage.
Yeah I've been back and forth on this with designs, the front leading edge does need to be flat so it can line up along the waist without bunching I think.

As for the narrowing, the design in those original posts the crotch piece gets narrower as it reaches where it needs to go between the legs and then flares back out accross the front as it comes out of the legs. The latest design theory for it that I haven't had time to test recently was to have it narrowing slowly from the back as it currently does but once it reaches the thinest point to basically straighten out and stay that same width all the way to the end.

I think this will stop the "shorts" issue but bon't know if it will then be too small to fully cover the front of a diaper, will need a test piece to see. It may be that I can make it a touch smaller at the narrowest point and then flare back out a tiny amount. will update when I've had time to experiment.

Schwanensee said:
Also: Do you find the serger to be easier to use? I keep going back and forth on wanting one, and so far I've gotten on just fine with just a decent sewing machine, but sometimes I think it could be convenient.
Well that depends. Overall I would say yes it is easier, just cut you fabric and serge them together, no need to worry about folding over seams and pinning/clipping them together just right (especially on fraying fabrics) or planning large seam allowances to then trim down later, jut line them up and go. Also no need to worry about switching between straight or stretchy stitch types.

They are much more work to thread them, anyone with a decent bit of experience threading sewing machines should be ok with it but it can be finicky getting all the threads where they should be it's not too bad though, at the same time the thread reels are much larger so you won't need to rethread it as much and there is a way to tie an old thread to a new one so it just carries on. Bit of a pain though if a project calls for different coloured threads on different seams, much easier just to find one colour that fits all of them.

Then there is the fact it can't really "sew", by that I mean it is basically only good for edges. Even with the blade down so it doesn't cut you can't really sew into the middle of something due to the way it loops the threads around. So you still need a sewing machine for those parts.

There are also all the settings to consider, a sewing machine you just choose your stitch type and maybe length set the one tension and off you go. A serger can have a different tension on each thread to adjust to get neat stitches which will need to change by fabric type and number of layers the stitch length and stitch width as well as a setting for the differential feed (the walking foot part) where you can adjust it to push more fabric from the front than it pulls from the back or vice versa and anywhere in between. This allows for fabrics (especially stretchier ones) to go through flat or to bunch up a bit or to stretch out giving either a clean straight edge, a "pleated" type edge or a "wavey" edge.

It is more work to figure out how all of these need to be set for each project so there is definitely a bigger learning curve but once you get this down it does allow a great variety of professional quality finished edges to be produced.
 
  • Like
Reactions: GatoChihuahua
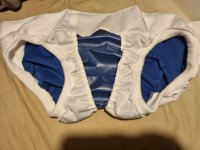
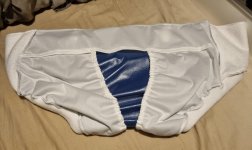
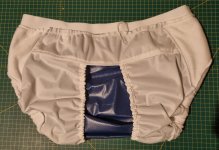
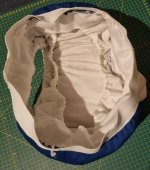
So I had some small lengths of PUL arrive for a test run on the pull up cover, I'm still waiting on a length of wider waistband elastic to arrive but as that's the last thing to sdew on anyway I went ahead and ran a prototype at full size, unlike the mini one I posted last. Also unlike the last I have added elastic to the gussets, the fleece leg cuffs and elastic for those.

Outside Front and Back
20230114_214916.jpg 20230114_214956.jpg

Inside Front and Back
20230114_215035.jpg 20230114_215105.jpg

The waistband will add 1.5 inches to the top and would also pull it in to give it a more recognisable shape but these turned out ok once I had figured out the tension settings to use. There were however a couple of issues with this prototype so there are lessons to be learned here.

  1. The size, I had carefully measured every length and angle on the originals to make a template and added a little extra to account for the cut off from the overlocker as well as folds for elastic casings. While this mostly worked there are a few areas where I will need to resize as they ended up smaller enough than the original that they will be a problem. Like the crotch width on the thinest point is about 1.5 inches too thin for the insert pad, the leg cuffs also ended up smaller than I hoped. This means making a new template and playing with a couple of the sizes.
  2. The elastic in the side gussets could be a couple inches shorter to help them stand up more. Also the original used a separate strip folded in half and sewn on to make a casing where I just folded the edge over to sew into a case, I thought I had added enough extra to do this but I think I need more as the gusset gets shallow at the front.
  3. I need to find another way to add the elastic and cases for the legs, the way I did it made it very fiddly to sew and required too much stretching to make it even which the serger didn't like. This awkwardness also led to me accidentally sewing over a fold on the back on one side which was heartbreaking. This shouldn't be a problem though, I can think of at least 2 other ways to do it
  4. For some reason after serging the wings to the back the waist edge lined up fine but the legs edge was too short, I don't know why this happened as they were the same length and there is no stretching, it will take exploring. Not a big issue as it helped with starting on the legs its just curious.
Other than this it went quite well, as a prototype I expected a few issues especially since I had to make the template from scratch with very rough measurements. This has proved that my reverse engineering worked and I can work out how to make them it just needs a little more tweaking to get it right.
 
  • Like
  • Love
Reactions: Cottontail, GatoChihuahua, NappiedTruckDriver and 2 others
So I sat down this moring with some paper and scissors and worked out why number 4 above with the wing edges not lining up after serging was happening, pretty obvious now I think about it, I have figured out how to fix this issue at least.

I also tried laying out an insert on top of the template to check if I had actually left enough room for it after it seemed too small at the thinnest point after sewing. I found that there is 1.5cm on each side of the insert (almost 3/4 of an inch) which if the serger is cutting off around half a cm and the stitching is a little over half a cm should be enough but does leave it a little close.

So next template I will widen the thinnest section a little more to give a bit of leeway, This will make the curve for the legs a little more shallow but should also help to increase the gusset width (since they use the same line) which will help solve issue no. 2 above.

I am also kinda tempted to decrease the back width a little (currently 53cm widest 41cm back edge) Since the waist circumference (122cm or 48") is way more than enough for my 39" waist, and the back end has plenty of room for the insert, this might help to fit more on a sheet of fabric (most fabric is around 150cm wide which is 9 cm to short to fit 3 side by side).

I don't want to reduce the front too much due to the gusset issue above but it may be possible to take a little from there so the back end still cover my bottom properly, I'll explore these options when I have time to try them on and look where adjustments can be made.

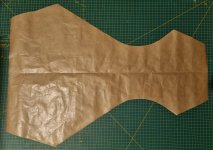
For reference here is the main body template (blue piece).
20230115_093311.jpg
 
  • Like
Reactions: GatoChihuahua and Blekyss
Final Update on the Threaded Armor Clone (hopefully)

I sat down and made a 1/5th scale paper template to figure out better sizes for everything.
  • For the main body I knocked about 3.5 inches off the back end both at the top edge and the widest point and made the thinest section in the crotch about 4cm wider.
  • With the side gussets I added about 1.5 cm on the inside edge for the elastic case, obviously the leg curve was wider in the thin section as it copies from the main body stopping the shallowness problem no. 2 above.
  • The front and back gussets I measured and cut off the 2 corners at an angle where it folds over and joins to the sides so there is no overhang to confuse matters.
  • The side wings had the biggest change, I used the main body template folded over 1.5 cm along where it would join front and back and used that line to make the wing template, I then unfolded the body template, flipped it over and used the actual edge (smaller) to create a shaped tab on the outside of the wing seam. When putting the pieces together this eliminates the problem I had where the wing's leg edge was about 1.5 cm shorter than it should be after sewing, now everything lines up perfectly.
.
Once complete and it looked good I drew up a full size template pattern, cut out some fabric and began to sew.

First up the Gussets, these went together so much better and easier than the first run, everything was smooth sailing. The extra width on the side gussets for elastic was way more than enough so I could reduce that a touch but it works so I will leave it for now. I also used 3" less on the 1/4" elastic for the side gussets to help them stand up more.

I then serged the top (waistline) edge which went smooth as silk

After spending much time trying to figure out the easiest way to do the leg elastic cases (the first time I tried to serge them to an already joind leg hole with the elastic looped inside which was a real pain to sew) I decided either:
  1. I could sew the wings to the back then add the case while it's flat, feed and join the elastic then sew the front to the wing. this would be easy to do but might cause problems when serging the wing on the front it would also mean the serged edge is on the leg cuff which may irritate.
  2. I could sew the wing front and back then serge the fleece case around the leg with one end tucked slightly into the other. I could then feed the elastic through, join it, tuck the ends of the fleece back into each other and sew it closed. This would perhaps be a bit more fiddly but would have the nicest finish.
I went with option 2. The wing sewed to the back perfectly with no mismatched edges and the same on the front. Lining up the fleece case on the leg hole was a bit finicky but once done it serged neatly, the 1/2" elastic threaded and joined up fine and closing the case was a cinch.

Now for the part that scared me a little, sewing the plush waist elastic.
This is a 1.5" (38mm) thick soft elastic and I only have 1 meter of it as it was £5 per meter (very nice soft touch elastic), it is far too big to use my fabric clips to hold it (I don't use pins on PUL) due to the way it needs to be sewn on flat over the edge. It would also need to be stretched slightly while sewn to match the larger edge on the fabric, and use a small zig zag stitch which I've had less practice with.

This last piece would make or break it all, so after gathering the courage I began. The line did go a little wonky in a couple places (not very noticeable) and I did miss the fabric edge at one point and had to go back to redo a couple inches. The part where the elastic is joined in a loop also shifted around a little with the stretching so I should have started with that bit but it's not a problem.

A lot of it ended up stitching a bit further down on the fabric than I would have liked because of the way I have to sew it I can't see both edges to line it up and couldn't clip it in place but it did work out.

There are 3 loose serger chains still to thread in (when I find my needle) but after all that, time for some piccies!

First up let's have a fun "spot the clone" game.
20230119_191246.jpg
20230119_191310.jpg

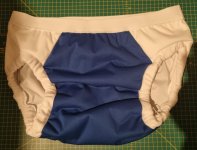
Did you figure it out? this should give it away here's the Front and Back outside.
20230119_191630.jpg 20230119_191658.jpg

Front and Back inside.
20230119_191354.jpg 20230119_191407.jpg

With a fully stacked insert snapped in place, there is now plenty of room for it but you can't quite see how well the gussets stand up here.
20230119_191105.jpg

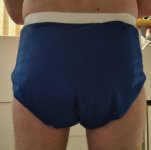
Finally (and with apologies for crotch shots) Here's how it looks when worn (with the inserts inside).

20230119_190845.jpg 20230119_190924.jpg 20230119_190953.jpg

In all I could definitely use a little more practice, especially with the waist elastic (and maybe some bigger clips for that), but I think it turned out good and I'm quite happy with the final result.

The slightly annoying part is that buying 3 of these, which come with the inserts, including the shipping and import fees to the UK is around £282 (about £94 each... Yikes!) or £158 for the 3 products alone without shipping and import fee which is £52 each.
But I can buy all the materials needed to make 6 of them with the inserts (with a little fabric left over) for about £168, that's only £28 each!
 
  • Love
  • Like
Reactions: Teddy, Selene, Cottontail and 1 other person
Wow! That’s so clever! Awesome job, you.

I’ve never made anything like that, but I do see frills onto things I’ve bought to make them more babyish.

I also made a multi-layer net petticoat once, using net curtain material!
 
  • Like
Reactions: GatoChihuahua and Belarin
Thank you, Belarin! I have really enjoyed following your sewing thread 😁🤗.

Awesome job! The results are very impressive indeed! 😍🙂🙂
 
  • Like
Reactions: Belarin
Thanks, I think my posts tend to get a bit long But I'm kinda using it as a way of tracking what I'm learning and doing so...
 
This is awesome. I need to read the whole post again and maybe try it out!!!
 
  • Like
Reactions: Belarin
WarriorPrincess said:
This is awesome. I need to read the whole post again and maybe try it out!!!
if youd like some help figuring out a template feel free to shout.
 
  • Love
Reactions: WarriorPrincess
Belarin said:
if youd like some help figuring out a template feel free to shout.
Thanks.
 
Whoa! That's some fast and first-rate diaper reverse-engineering there, @Belarin. Looks fantastic. I hope it acquits itself nicely in... uh... "dynamic testing," heh.

You're definitely inspiring me to hurry the f--- up and get back to the diaper-making!
 
Belarin said:
Final Update on the Threaded Armor Clone (hopefully)

I sat down and made a 1/5th scale paper template to figure out better sizes for everything.
  • For the main body I knocked about 3.5 inches off the back end both at the top edge and the widest point and made the thinest section in the crotch about 4cm wider.
  • With the side gussets I added about 1.5 cm on the inside edge for the elastic case, obviously the leg curve was wider in the thin section as it copies from the main body stopping the shallowness problem no. 2 above.
  • The front and back gussets I measured and cut off the 2 corners at an angle where it folds over and joins to the sides so there is no overhang to confuse matters.
  • The side wings had the biggest change, I used the main body template folded over 1.5 cm along where it would join front and back and used that line to make the wing template, I then unfolded the body template, flipped it over and used the actual edge (smaller) to create a shaped tab on the outside of the wing seam. When putting the pieces together this eliminates the problem I had where the wing's leg edge was about 1.5 cm shorter than it should be after sewing, now everything lines up perfectly.
.
Once complete and it looked good I drew up a full size template pattern, cut out some fabric and began to sew.

First up the Gussets, these went together so much better and easier than the first run, everything was smooth sailing. The extra width on the side gussets for elastic was way more than enough so I could reduce that a touch but it works so I will leave it for now. I also used 3" less on the 1/4" elastic for the side gussets to help them stand up more.

I then serged the top (waistline) edge which went smooth as silk

After spending much time trying to figure out the easiest way to do the leg elastic cases (the first time I tried to serge them to an already joind leg hole with the elastic looped inside which was a real pain to sew) I decided either:
  1. I could sew the wings to the back then add the case while it's flat, feed and join the elastic then sew the front to the wing. this would be easy to do but might cause problems when serging the wing on the front it would also mean the serged edge is on the leg cuff which may irritate.
  2. I could sew the wing front and back then serge the fleece case around the leg with one end tucked slightly into the other. I could then feed the elastic through, join it, tuck the ends of the fleece back into each other and sew it closed. This would perhaps be a bit more fiddly but would have the nicest finish.
I went with option 2. The wing sewed to the back perfectly with no mismatched edges and the same on the front. Lining up the fleece case on the leg hole was a bit finicky but once done it serged neatly, the 1/2" elastic threaded and joined up fine and closing the case was a cinch.

Now for the part that scared me a little, sewing the plush waist elastic.
This is a 1.5" (38mm) thick soft elastic and I only have 1 meter of it as it was £5 per meter (very nice soft touch elastic), it is far too big to use my fabric clips to hold it (I don't use pins on PUL) due to the way it needs to be sewn on flat over the edge. It would also need to be stretched slightly while sewn to match the larger edge on the fabric, and use a small zig zag stitch which I've had less practice with.

This last piece would make or break it all, so after gathering the courage I began. The line did go a little wonky in a couple places (not very noticeable) and I did miss the fabric edge at one point and had to go back to redo a couple inches. The part where the elastic is joined in a loop also shifted around a little with the stretching so I should have started with that bit but it's not a problem.

A lot of it ended up stitching a bit further down on the fabric than I would have liked because of the way I have to sew it I can't see both edges to line it up and couldn't clip it in place but it did work out.

There are 3 loose serger chains still to thread in (when I find my needle) but after all that, time for some piccies!

First up let's have a fun "spot the clone" game.
View attachment 100647
View attachment 100648

Did you figure it out? this should give it away here's the Front and Back outside.
View attachment 100642 View attachment 100643

Front and Back inside.
View attachment 100644 View attachment 100645

With a fully stacked insert snapped in place, there is now plenty of room for it but you can't quite see how well the gussets stand up here.
View attachment 100646

Finally (and with apologies for crotch shots) Here's how it looks when worn (with the inserts inside).

View attachment 100649 View attachment 100650 View attachment 100651

In all I could definitely use a little more practice, especially with the waist elastic (and maybe some bigger clips for that), but I think it turned out good and I'm quite happy with the final result.

The slightly annoying part is that buying 3 of these, which come with the inserts, including the shipping and import fees to the UK is around £282 (about £94 each... Yikes!) or £158 for the 3 products alone without shipping and import fee which is £52 each.
But I can buy all the materials needed to make 6 of them with the inserts (with a little fabric left over) for about £168, that's only £28 each!
You did so good! Working out well?
 
Cottontail said:
Whoa! That's some fast and first-rate diaper reverse-engineering there, @Belarin. Looks fantastic. I hope it acquits itself nicely in... uh... "dynamic testing," heh.

You're definitely inspiring me to hurry the f--- up and get back to the diaper-making!
SpAzpieSweeTot said:
You did so good! Working out well?
Could have been faster had the fabrics and elastic arrived a bit sooner. I do believe I have the right measurements now, I'd kinda like to remove as much as possible so I can make the most out of a length of fabric but don't think it would be worth going much more.

The next thing to do is plug it into Valentina and work out some calculations to get the same size and shape that I have but based on actual body measurements not the measured sizes from the original, this way I can have it automatically scale up or down for different sizes.

As for testing, I snapped in some inserts today and gave it a good use (drank a little too much coffee today to help things flow lol) it has lasted all day with no leaks or wicking so I'd say it does the job well, it fits a little snugger than the originals but I knew this would be as I specifically used a little less elastic than I thought I'd need (only a smidgin) because that's the one thing I've not been so happy about with the originals (had to go for large as I'm right on the cusp).
 
  • Like
Reactions: Cottontail
Back
Top