Pics 1
Well, I didn't take any pictures during the construction -- BUT, as luck would have it, it didn't come out perfectly. There were some problems, but I continued assembling anyway just for a "proof of concept." It worked out, and I have a second one already in progress, having learned from my mistakes on the first one.
In this first batch of images, try to ignore the extra pieces of (red) material around the seams where the waistband meets the main body. I made a bad decision with regard to finishing the edges of the waistband (specifically, I decided not to bother) and they started tearing in that spot. The second one I am building (some pics will be in the next reply) will be assembled differently and will thus avoid this problem, but for the "proof" one, I just had to sew some extra material over the tearing area to reinforce it.
First, meet Cameron. He should be about 6'4", but due to a tragic manufacturing decision, was decapitated at birth. Weighing in at only 30 pounds, but with a body strong as fiberglass, Cameron was completely unfazed when a 130-pound "child" fell asleep on his back for two hours.
When Cameron moved in, my two roommates - one male one female - had a fight over whose boyfriend he was going to be. Somehow he was not traumatized, and in fact he outlasted both roommates. He is still a resident of my home, and will be helping to show this carrier in several images.

Now on to the carrier itself. The body is made of some sort of thin denim material. You can make it out of just about anything, but this is the weight-supporting layer, so please choose something strong. I purchased all of the fabric involved from JoAnn Fabric.
As you view the seam detail where the waistband meets the body, please try to remember that this is not the final "perfect" product.


The inside of the carrier is made of a lighter knit material. Both the inner and outer layers are made in the same three-panel configuration: a center panel and two side panels. Each layer is made separately and then they are sewn together "inside-out". This is the point at which I should have attached the waistband and shoulder straps (I will in the second version). The carrier is then flipped the "right" way, and another row of stitching is added at each seam where panels meet, to ensure that the inner and outer layers do not slide around relative to one another.

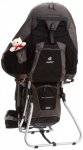
Here are some pictures of the carrier in position, without a person in it:


And a good detail image of the seams between panels:

The side and shoulder fasteners -- note that there is a slight tear next to the shoulder strap: I made the same mistake here as I did on the waistband, and this is being corrected in the second version. I COULD reinforce this one... actually I probably will. Remember that I realized my error early on, but just kept going - I really just wanted something to test and see if my size/scaling was correct before I put a whole lot of effort into fixing the issues.


Here are some details of the fastener used for the waistband. It's nothing high-tech or fancy.


And last but not least, here is the shoulder/side strap configuration from the other side:

I wasn't sure exactly what you wanted pictures of - I hope these are helpful. If there are any other specific parts or details you would like to see, by all means, let me know.
I will be posting a batch of pics of the new "in progress" one shortly, and next time I can get a day off from work I'll get a friend over here for a video.


")


